BASIC HTML:
HTML Basic Statement:-
## The <!DOCTYPE html> declaration defines the document type.
## HTML is a language for describing web pages
## HTML documents are also called web pages
## HTML Element is everything between the start tag and the end tag
##Version Year
HTML -> 1991
HTML+ -> 1993
HTML 2.0 -> 1995
HTML 3.2 -> 1997
HTML 4.01 -> 1999
XHTML -> 2000
HTML5 -> 2012
## When you save an HTML file, you can use either the .htm or the .html file extension, There is no difference.
Web Page Design: A simple web page design:-
Steps 1.
At first go to Control Panel -> Folder options -> View -> uncheck the hide extensions for known file types -> Apply -> ok.Write in notepad ----
<html>
<head>
<title>My First Web Page</title>
</head>
</html>
Steps 2.
save the page -> Mehedi.html (without .txt) and Open the file in a Browser.
What you see?
You see a title of a Web Page that is -> My First Web Page.
You can believe that !!.. You already create a web page Title.
A web page contains two main parts-
1. Head (Title)
2. Body
Steps 3.
Now you can create a body ---
<html>
<head>
<title>My First Web Page</title>
</head>
<body>
This is the body of a web page.
</body>
</html>
Wow!!!... You have created a web page!!!....
Create A Age Calculator with the below code:
How old are you? We can know our age (Years, Months & Days) very easily with this calculator. Copy & Paste the below code in a notepad editor and save this notepad namely "Age Calculator.html". Open the file with a browser and get a calculator like as below picture--

Fig: Age Calculator
The Sample Age Calculator, you can calculate your age here very easily:-
The Age Calculator Code is:-
<div style="z-index: 9999; position: relative;">
<iframe scrolling="No" style="border: 0px none; overflow: auto; margin: 25px auto; width: 100%; height: 586px;" src="http://tools.dimpost.com/raw/age-calculator.html"></iframe><div style="text-align:center;margin: -4px 0 5px;"><a style="color:#FFFFFF; font-size:65%; text-decoration: none;" href="http://tools.dimpost.com" target="_blank">tools.dimpost.com</a></div></div>
Some softwares of Website Design:
1. Notepad(Windows by Default) or TextEdit(Mac.)
2. Notepad++
3. Adobe Macromedia Dreamweaver
4. Microsoft Office Publisher
5. Microsoft Expression Web
6. CoffeeCup HTML Editor
THERE ARE TWO SECTION OF WEB PAGE-
1. Head - [ Title ]
2. Body
Add Favicon in Front of Title:-
<title></title> -এর পর সাধারনত Favicon -এর Link দিতে হয়।
<link rel="icon" href="Images/favicon.ico"type="image/x-icon"/>
Use Anchor Text & BB code:
Anchor Text Format:
<a href="website link">Desired Name</a>
Example:-
<a href="http://www.google.com">Google</a>
BB code Format:
[url=website link]Desired Name[/url]
Example:-
[url=http://www.google.com ]Google[/url]
Do Follow or No Follow Link:-
<a href="http://pcnettechnology.blogspot.com" nofollow>pcnettechnology</a>
<a href="http://pcnettechnology.blogspot.com" dofollow>pcnettechnology</a>(Forcely Follow)
<a href="http://pcnettechnology.blogspot.com" dofollow>pcnettechnology</a>(Forcely Follow)
Use Anchor Tag with #:-
<a #href="http://pcnettechnology.blogspot.com">pcnettechnology</a>
Use Many CSS File in One Link:-
First CSS File Name টি HTML -এর Link -এ যোগ করে দিলেই সবকটি CSS File HTML -এর সাথে Link হয়ে যাবে।
First CSS File Name: Style.css
Content of First CSS File: @import url(Style2.css);
@import url(Style3.css);
@import url(Style4.css);
@import url(Style5.css);
@import url(Style6.css);
Second CSS File Name: Style2.css
Third CSS File Name: Style3.css
Fourth CSS File Name: Style4.css
Fifth CSS File Name: Style5.css
Sixth CSS File Name: Style6.css
HTML RELATED ELABORATION:
HTML = Hyper Text Markup Language
CSS = Cascading Style Sheet
PHP = PHP Hypertext Preprocessor
Src = Source
Img = Image
href = hyper reference
div = division
nav = navigation
OL = Order List
UL = Unorder List
hr = horizontal line
mysql = old version
mysqli = improve version
em = Emphasized (Italic)
i = Initialization/integer
s = String
USES OF SOME HTML TAGS
## HTML Tags + Plain Text ---> HTML Language
## < > -----> Angle bracket or Curly Bracket
## Opening Tag + Closing Tag ---> Full Tag or Tag
<html> + </html> <html></html>
## <html></html> ----> HTML Tag Contains whole HTML Language
## <head></head> ----> Head Tag Contains Title
## <title></title> ----> Title Tag Uses to Title writing
## <body></body> ----> Body Tag uses to Body writing
## <table></table> -----> Table Tag uses to Making Table
## <strong></strong>[<b></b>] -----> Strong or b Tag use to font Bold
## <em></em>[<i></i>] ----> Em or i Tag use to font Italic
## <u></u> ----> U Tag uses to font Underline
## <q></q> ----> Q Tag uses for quotation
## <div></div> ----> Division Tag uses to devide a page with different sector
## <form></form> ----> Form Tag uses to user input in a web page
## <nav></nav> ----> Navigation Tag uses to shift an another page of a website
## <style><style> ----> Style Tag uses to make-up or colourful a web page
## <blockquote></blockquote> ----> Blockquote Tag uses for paragraph & Left empty space of whole text
## <marquee direction="left"></marquee> --> Animated Text
## <embed src="file name.mp4/wmv/so on" width="400" height="200" autoplay="false">
----> Embed Tag uses to Video publishing
## <img src="image name.jpg/png/so on" width="500" height="300">
----> Img Tag uses to Image publishing
## <p></p> ----> P Tag uses to Making Paragraph
## <ol><li><li><li></ol> ----> Ordered List(OL) or
(1. 2. 3. .....)
## <ul><li><li><li></ul> ----> Unordered List (UL) or Bullet List ( * * * ...... )
## <a href="URL">Link on</a> [<a></a>] ----> A Tag uses to publishing a Website Link
## <link href="URL"/> ----> Page Link
## <h1></h1> ----> h1 Tag uses to making HTML Heading
## <h2></h2> or <h3></h3> or
<h4></h4> or <h5></h5> or <h6></h6>---->h1 to h6 Tags use to Sequensely decrease of Font size
## <br/> ----> br Tag uses to Make a single Line Break(This is a Empty Element)
## <hr> ----> hr Tag uses to create a horizontal line to separate a content
## <div style="margin: 0px 0px 0px 0px; background- color:Blue">Mehedi</div>
----> Background-color without Margin
## <div style=" width: 100%; height: 75px; background- color:#0000FF"><div style="font-size: 36px; font- family: Verdana; font-weight: bold; color:#FFFFFF; margin: 24px 0px 0px 100px; position:absolute">facebook</div>
----> Facebook Design
## <select></select> ----> Making a Drop-Down List
## <option></option> ----> Making a Option of a Drop- Down List
## <select>
<option>1</option>
<option>2</option> ----> Drop-Down List
<option>3</option>
</select>
## <table></table> ----> Defines a table
## <tr></tr> ----> Defines a Row in a table
## <td></td> ----> Defines a Cell in a tableme
## <style>table,td {
border:1px solid red;}</style> ----> Making a table & Cell Border(within head)
## <time></time> ----> Defines a Date/Time
## <!--....---> ----> Defines a Comment
## <button></button> ----> Making a Button
## <button type="button" onclick="alert('I want to kiss U!!!...')">Hi!</button>
----> Making a alert onclick the button
## <sub></sub> ----> Subscript
## <sup></sup> ----> Superscript
## <small></small> ----> Making a small text
## <pre></pre> ----> preformatted text (Show same in the browser)
## <code></code> ----> Defines computer code text
## <address></address> ----> Write a address
## <mark></mark> ----> Defines marked/highlighted text.
Create A Web Page Table:
We can create a table in our website to show many different data. I show a simple table code below.
The Code of Web Page Table is:-
The Code of Web Page Table is:-
<html>
<table border="" style=" width:100%; height:400px;">
<tr>
<td>Mehedi Hasan</td>
<td colspan="2">Miraj Hossain</td>
</tr>Ami vat khai<tr>
<td rowspan="2">Mehedi Hasan</td>
<td>Ami dal-vat khai</td>
<td>Tumi ki khou?</td>
</tr><tr>
<td colspan="2">Miru ki koris?</td>
</tr>
</table>
<body>
</body>
</html>

Created table looks like as below :-

Create A Select Box:
We can create a large or small select box as we want. Below I show the both select box code.
The Code of Small Select Box is:-
<select>
<option>Day</option>
<option>Sunday</option>
<option>Monday</option>
<option>Tuesday</option>
<option>Wednesday</option>
<option>Thursday</option>
<option>Friday</option>
<option>Saturday</option>
</select>
The Code of Small Select Box is:-
<select>
<option>Day</option>
<option>Sunday</option>
<option>Monday</option>
<option>Tuesday</option>
<option>Wednesday</option>
<option>Thursday</option>
<option>Friday</option>
<option>Saturday</option>
</select>


Fig: The Created Select Box with Above Code
Create Another Select Box:
We can use the below code for large select box. Such as - for year-> 1971 to 2025 or for month-> January to December or for month-> 1 to 31 etc.
The Code of Large Select Box is:-
<script language="javascript">
document.write("<select><option>Month</option>");
var mn = Array("January","February","March","April","May","June","July","August","September","October","November","December");
for(var i=0;i<mn.length;i++){
document.write('<option>' + mn[i] + '</option>');
}
document.write("</select>");
document.write("<select><option>Day</option>");
for(var i=1;i<32;i++){
document.write("<option>" + i + "</option>");
}
document.write("</select>");
document.write("<select><option>Year</option>");
for(var i=1985;i<2006;i++){
document.write("<option>" + i + "</option>");
}
document.write("</select>");
</script>

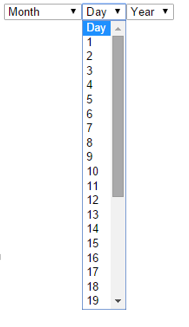
Fig: The Created Select Box with Above Code
Create A Drop Down Menu Bar in a Website:
We can create a drop down menu bar in our website very easily.To do this we need HTML & CSS both code. Below I show the both code. Create a notepad document namely drop_down.html & paste the HTML code. Create a another notepad document namely style.css in css folder & paste the css code.


The HTML Code is:- The HTML code of drop_down menu bar.
<!DOCTYPE html>
<head>
<title>Dropdown NavMenu</title>
<link rel="stylesheet" href="css/style.css" />
</head>
<body>
<div id="wrapper">
<div id="navMenu">
<ul>
<li><a href="#">Products</a>
<ul>
<li><a href="#">Link Item</a></li>
<li><a href="#">Link Item-2</a></li>
<li><a href="#">Link Item-3</a></li>
<li><a href="#">Link Item-4</a></li>
</ul> <!-- end inner UL -->
</li> <!-- end Main UL -->
</ul> <!-- end Main UL -->
</div> <!-- end navMenu -->
</div> <!-- end wrapper -->
</body>
</html>
The CSS Code is:- The CSS code of drop_down menu bar.
@charset "utf-8";
#navMenu{
margin:0;
padding:0;
}
#navMenu ul{
margin:0;
padding:0;
line-height:30px;
}
#navMenu ul li{
margin:0;
padding:0;
list-style:none;
float:left;
position:relative;
background:#999;
}
#navMenu ul li a{
text-align:center;
text-decoration:none;
font-family:arial;
height:30px;
width:150px;
display:block;
color:#FFF;
border:1px solid #FFF;
text-shadow:1px 1px 1px #000;
}
#navMenu ul ul{
position:absolute;
visibility:hidden;
top:30px;
}
#navMenu ul li:hover ul{
visibility:visible;
}
#navMenu li:hover{
background:#09F;
}
#navMenu ul li:hover ul li a:hover{
background:#CCC;
color:#000;
}
#navMenu a:hover{
color:#000;
}
.clearFloat{
clear:both;
margin:0;
padding:0;
}


Fig: CSS Folder & Drop_Down HTML File
Fig: Main Menu
Fig: Drop_Down Menu (After Touch the Main Menu)
The HTML Code is:- The HTML code of drop_down menu bar.
<!DOCTYPE html>
<head>
<title>Dropdown NavMenu</title>
<link rel="stylesheet" href="css/style.css" />
</head>
<body>
<div id="wrapper">
<div id="navMenu">
<ul>
<li><a href="#">Products</a>
<ul>
<li><a href="#">Link Item</a></li>
<li><a href="#">Link Item-2</a></li>
<li><a href="#">Link Item-3</a></li>
<li><a href="#">Link Item-4</a></li>
</ul> <!-- end inner UL -->
</li> <!-- end Main UL -->
</ul> <!-- end Main UL -->
</div> <!-- end navMenu -->
</div> <!-- end wrapper -->
</body>
</html>
The CSS Code is:- The CSS code of drop_down menu bar.
@charset "utf-8";
#navMenu{
margin:0;
padding:0;
}
#navMenu ul{
margin:0;
padding:0;
line-height:30px;
}
#navMenu ul li{
margin:0;
padding:0;
list-style:none;
float:left;
position:relative;
background:#999;
}
#navMenu ul li a{
text-align:center;
text-decoration:none;
font-family:arial;
height:30px;
width:150px;
display:block;
color:#FFF;
border:1px solid #FFF;
text-shadow:1px 1px 1px #000;
}
#navMenu ul ul{
position:absolute;
visibility:hidden;
top:30px;
}
#navMenu ul li:hover ul{
visibility:visible;
}
#navMenu li:hover{
background:#09F;
}
#navMenu ul li:hover ul li a:hover{
background:#CCC;
color:#000;
}
#navMenu a:hover{
color:#000;
}
.clearFloat{
clear:both;
margin:0;
padding:0;
}
Create A Page Like Facebook:
We can create a page like Facebook front page. See below page & also see the HTML code for this page.
The Facebook Page HTML Code is:-
<!DOCTYPE>
<html>
<head>
<title>Facebook</title>
</head>
<body>
<form name="x">
<table style="width:100%; background-color:#0099FF;">
<tr style="height:75px;">
<td width="50%" style="color:#FFFFFF; font-size:38px; vertical-align:bottom; font-family:Verdana;"> <div style="margin-left:10px;"> facebook </div> </td>
<td style="color:#FFFFFF; font-size:14px;"> Email or Phone <br/>
<input type="text" name="nm"/>
<br/>
<input type="checkbox"/>
<a href="#" style="color:#FFFFFF; text-decoration:none;"> Keep me log in </a> </td>
<td style="color:#FFFFFF; font-size:14px;"> Passward <br/>
<input type="password" name="ps"/>
<br/>
<a href="#" style="color:#FFFFFF; text-decoration:none;"> Forget your password </a> </td>
<td width="8%"><input type="button" value="Log In" onclick="ab()" name="button"/>
</td>
</tr>
</table>
<table style=" width:100%; background-color:#BFDFFF; ">
<tr>
<td rowspan="9" style="width:50%">Connect with friend and the<br/>world around you on Facebook.
</td>
<td>Sign up</td>
</tr>
<tr>
<td>Its free always and will be</td>
</tr>
<tr>
<td><input type="text" style="width:150px" />
<input type="text" style="width:150px"/></td>
</tr>
<tr>
<td><input type="text" style="width:310px"/><td>
</tr>
<tr>
<td><input type="text" style="width:310px"/></td>
</tr>
<tr>
<td> <input type="password" style="width:310px"/></td>
<tr>
<td>Birthday:<br/>
<script language="javascript">
document.write("<select><option>Month</option>");
var mn = Array("January","February","March","April","May","June","July","August","September","October","November","December");
for(var i=0;i<mn.length;i++){
document.write('<option>' + mn[i] + '</option>');
}
document.write("</select>");
document.write("<select><option>Day</option>");
for(var i=1;i<32;i++){
document.write("<option>" + i + "</option>");
}
document.write("</select>");
document.write("<select><option>Year</option>");
for(var i=1985;i<2006;i++){
document.write("<option>" + i + "</option>");
}
document.write("</select>");
</script>
</td>
</tr>
<tr>
<td> <input type="radio" name="Gender"/>Male<input type="radio" name="Gender"/> Female</td>
</tr>
<tr>
<td><input type="submit" value="Singn up"/></td>
</tr>
</tr>
</table>
</form>
<!--
<div style="width:100%; height:85px; background-color:#0066FF;">
<div style="color:#FFFFFF; font-size:36px; font-weight:Bold; font-family:Verdana; margin:15px 5px; position:absolute;">facebook</div>
<div style="margin-left:650px; margin-top:20px; position:absolute;">
<form>
<input type="text"/>
<input type="password"/>
<input type="button" value="Log In"/>
<br/>
<input type="checkbox"/>
Keep me log in forget your password
</form>
</div>
</div>
</html>


<!DOCTYPE>
<head>
<title>Show Magic</title>
<script language="javascript">
var a = "Mehedi";
var b = "Miraj";
var c = "Shaon";
var d = "Sipon";
function ab(){
document.getElementById("Shuvo").innerHTML = a;
}
function bc(){
document.getElementById("Shuvo").innerHTML = b;
}
function ca(){
document.getElementById("Shuvo").innerHTML = c;
}
function xy(){
document.getElementById("Shuvo").innerHTML = d;
}
</script>
</head>
<body>
<input type="button" value="Show Magic" onclick="ab()" onmouseover="bc()"
onmouseout="ca()" ondblclick="xy()">
<div id="Shuvo"></div>
</body>
</html>
<!DOCTYPE>
<html>
<head>
<title>Facebook</title>
</head>
<body>
<form name="x">
<table style="width:100%; background-color:#0099FF;">
<tr style="height:75px;">
<td width="50%" style="color:#FFFFFF; font-size:38px; vertical-align:bottom; font-family:Verdana;"> <div style="margin-left:10px;"> facebook </div> </td>
<td style="color:#FFFFFF; font-size:14px;"> Email or Phone <br/>
<input type="text" name="nm"/>
<br/>
<input type="checkbox"/>
<a href="#" style="color:#FFFFFF; text-decoration:none;"> Keep me log in </a> </td>
<td style="color:#FFFFFF; font-size:14px;"> Passward <br/>
<input type="password" name="ps"/>
<br/>
<a href="#" style="color:#FFFFFF; text-decoration:none;"> Forget your password </a> </td>
<td width="8%"><input type="button" value="Log In" onclick="ab()" name="button"/>
</td>
</tr>
</table>
<table style=" width:100%; background-color:#BFDFFF; ">
<tr>
<td rowspan="9" style="width:50%">Connect with friend and the<br/>world around you on Facebook.
</td>
<td>Sign up</td>
</tr>
<tr>
<td>Its free always and will be</td>
</tr>
<tr>
<td><input type="text" style="width:150px" />
<input type="text" style="width:150px"/></td>
</tr>
<tr>
<td><input type="text" style="width:310px"/><td>
</tr>
<tr>
<td><input type="text" style="width:310px"/></td>
</tr>
<tr>
<td> <input type="password" style="width:310px"/></td>
<tr>
<td>Birthday:<br/>
<script language="javascript">
document.write("<select><option>Month</option>");
var mn = Array("January","February","March","April","May","June","July","August","September","October","November","December");
for(var i=0;i<mn.length;i++){
document.write('<option>' + mn[i] + '</option>');
}
document.write("</select>");
document.write("<select><option>Day</option>");
for(var i=1;i<32;i++){
document.write("<option>" + i + "</option>");
}
document.write("</select>");
document.write("<select><option>Year</option>");
for(var i=1985;i<2006;i++){
document.write("<option>" + i + "</option>");
}
document.write("</select>");
</script>
</td>
</tr>
<tr>
<td> <input type="radio" name="Gender"/>Male<input type="radio" name="Gender"/> Female</td>
</tr>
<tr>
<td><input type="submit" value="Singn up"/></td>
</tr>
</tr>
</table>
</form>
<!--
<div style="width:100%; height:85px; background-color:#0066FF;">
<div style="color:#FFFFFF; font-size:36px; font-weight:Bold; font-family:Verdana; margin:15px 5px; position:absolute;">facebook</div>
<div style="margin-left:650px; margin-top:20px; position:absolute;">
<form>
<input type="text"/>
<input type="password"/>
<input type="button" value="Log In"/>
<br/>
<input type="checkbox"/>
Keep me log in forget your password
</form>
</div>
</div>
</html>
<SCRIPT Language=VBScript><!-- Show Magic:
We can show a magic in a website by the HTML code. See below magic box "Show Magic". Four name seen below the same magic box.
The characteristics of the Magic box are:-
1. Shaon name is normally seen below the Magic box
2. Miraj name is seen When touch the Magic box
3. Mehedi name is seen When click the Magic box
4. Sipon name is seen When double click the Magic box
The Magic Code is:-
<head>
<title>Show Magic</title>
<script language="javascript">
var a = "Mehedi";
var b = "Miraj";
var c = "Shaon";
var d = "Sipon";
function ab(){
document.getElementById("Shuvo").innerHTML = a;
}
function bc(){
document.getElementById("Shuvo").innerHTML = b;
}
function ca(){
document.getElementById("Shuvo").innerHTML = c;
}
function xy(){
document.getElementById("Shuvo").innerHTML = d;
}
</script>
</head>
<body>
<input type="button" value="Show Magic" onclick="ab()" onmouseover="bc()"
onmouseout="ca()" ondblclick="xy()">
<div id="Shuvo"></div>
</body>
</html>
This has been a very significant blog indeed. I've acquired a lot of helpful information from your article. Thank you for sharing such relevant topic with us.
ReplyDeleteseo
awesome post.thank you so much
ReplyDeleteweb designing in jaipur
Thanks for your great information, the contents are very interesting.
ReplyDeleteWeb Design Company in Mysore | web development in Mysore | web designers in Mysor | IT companies in Mysore | Web Design Companies in Mysore | Software Companies in Mysore